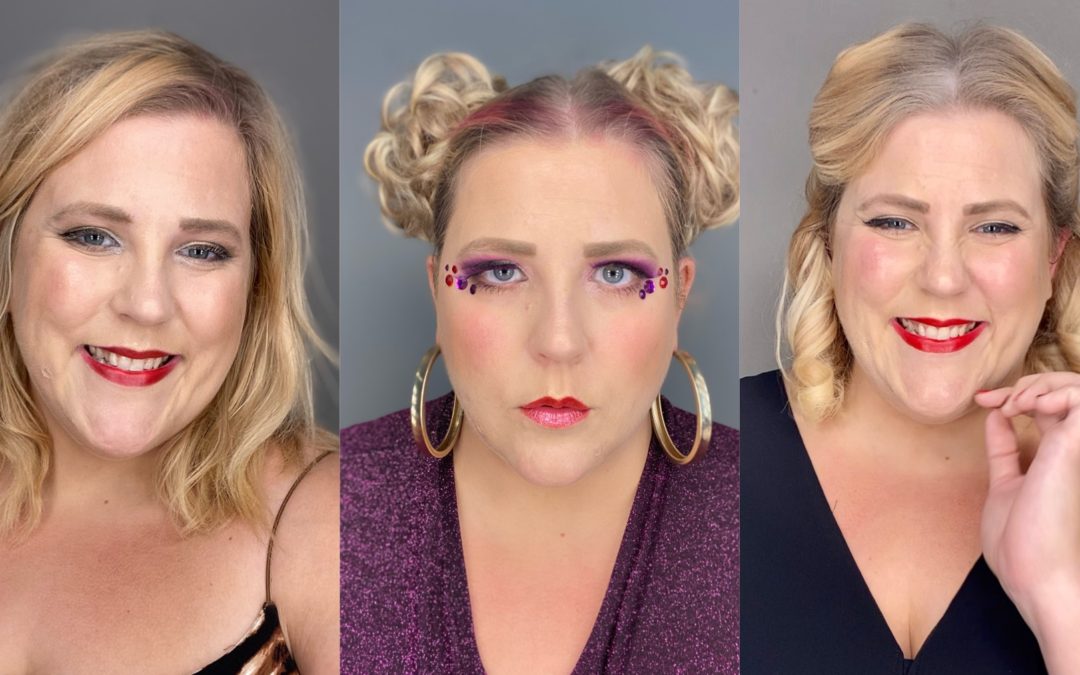
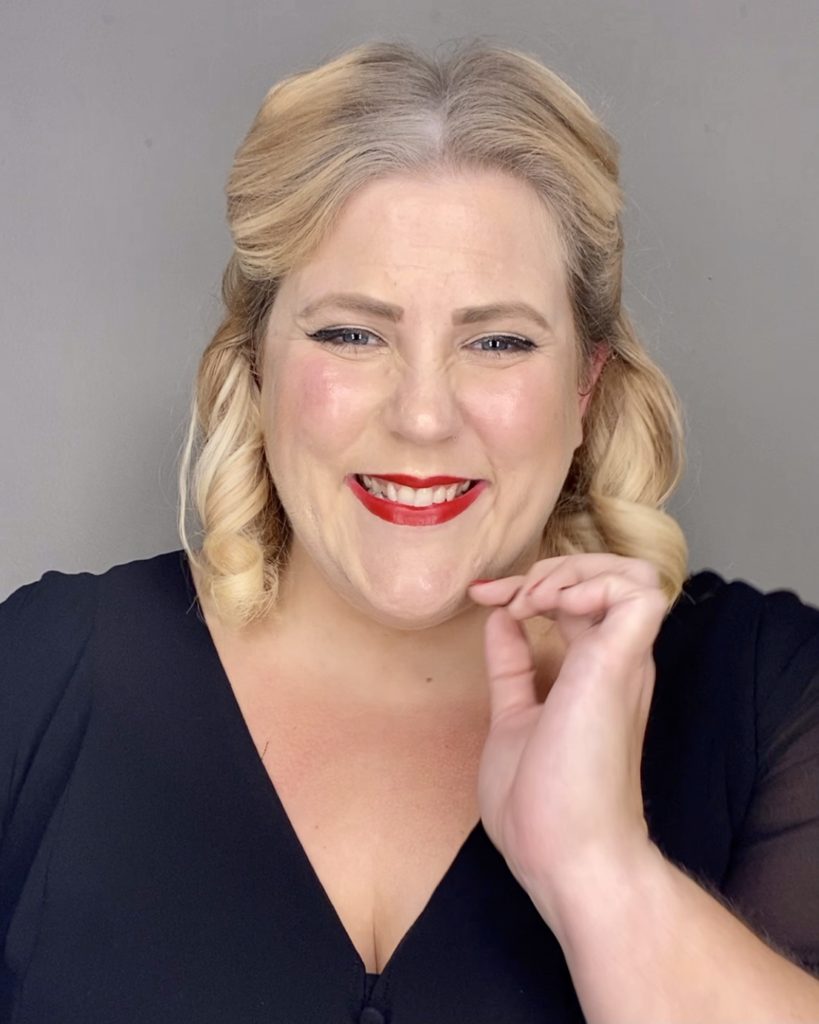
The result was a great base make up, because it can easily be transformed into a whole new vibe with only a few small tweaks, Add some whiskers- boom you’re a cat. Pump up the eye liner- Boom you’re a witch. Curl your hair, you’re like me- a 1930 starlette.
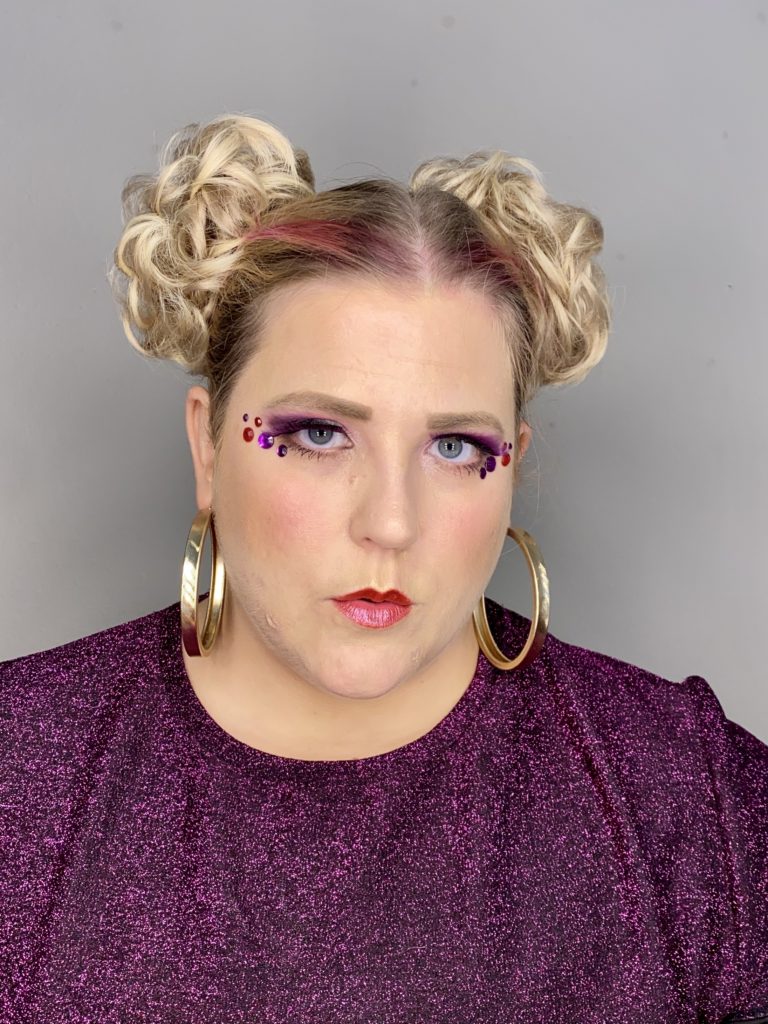
Lots of people ask me how I shoot so many different things in a day. What I do is start with a great base (like this one) and build on my make up and hair with each look. So by using the glitter lipstick/gloss and another NYX product ( this amazingly colorful palette) to add a punch of purple on my lids. all of the sudden I’ve gone from the all that jazz to funky town.
Halloween is about stepping outside of your comfort zone. An easy way to do that is start with something you love- like your go to every day make up- and build on it. Let yourself go a little ( or a lot) wild. You might be surprised with what you come up with!
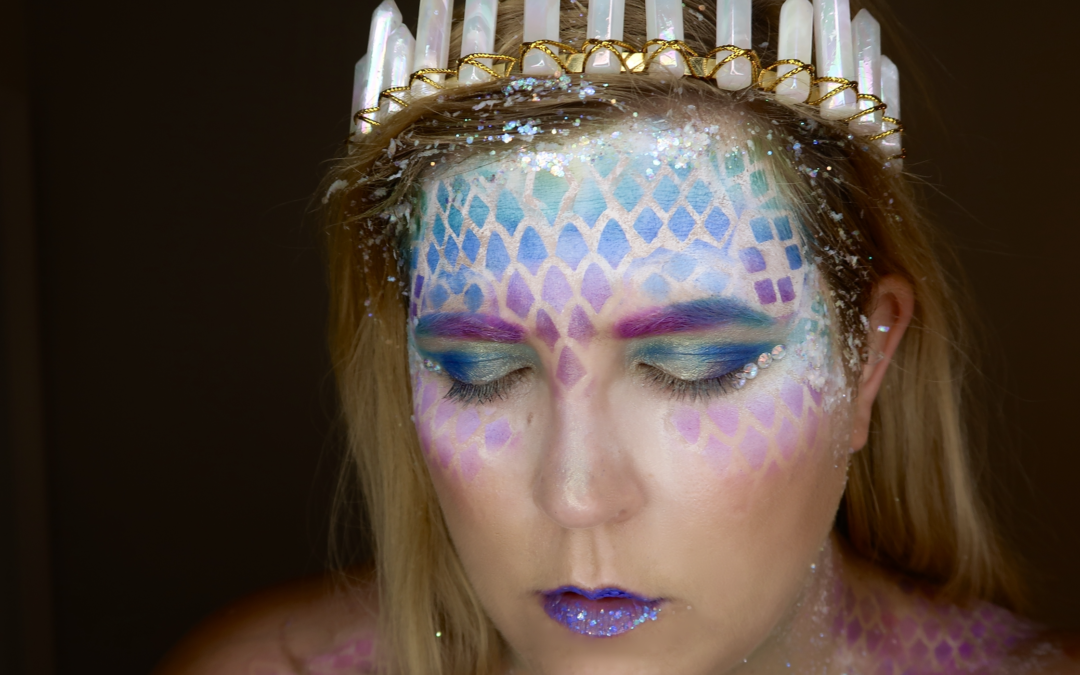
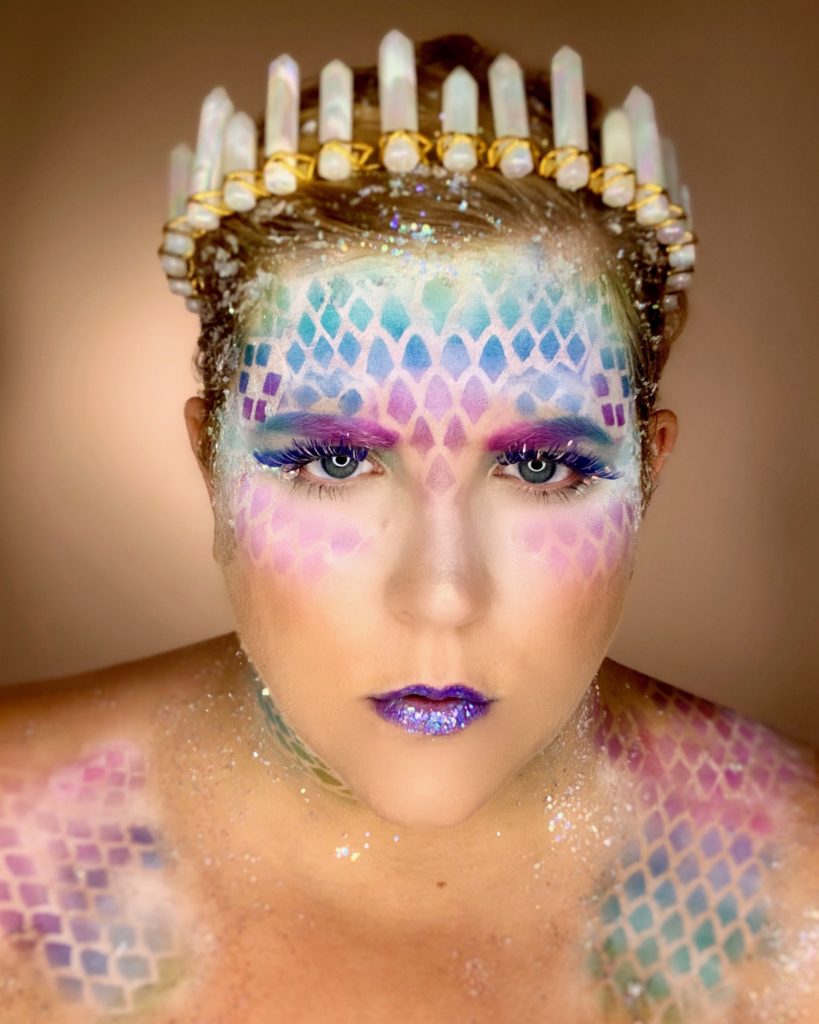
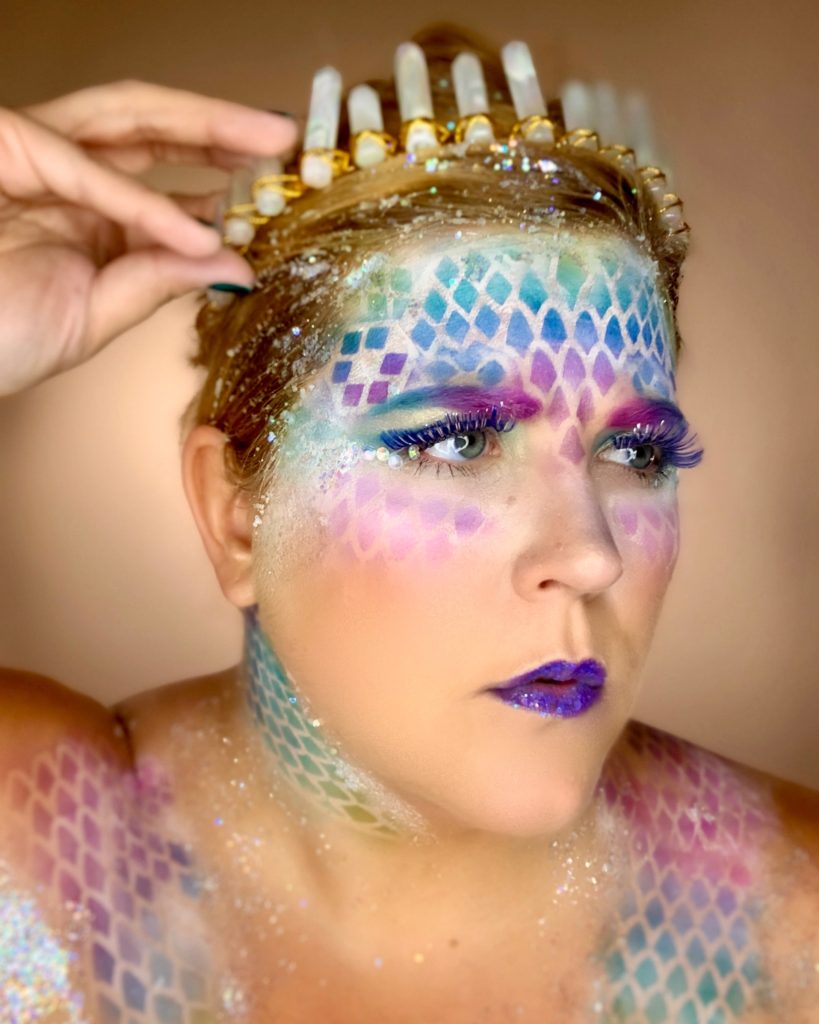
I’ve tried to turn myself into a mermaid before using make up. Oh yes, I’ve pulled fishnet tights over my face and dabbed the heck out of my brow with grease make up. And sure, in the end I did end up looking kind of mermaid-y, but it was clearly amateur hour.
This time I decided to really try to really bring the scale-y sass-bot of my dreams to life. I went to walmart.com and was able to find nearly everything I needed; the extra bits and bobs ( like my sea queen crown) I picked up in-store. I may or may not have also put several new pairs of seasonal press-on nails in my cart as well, because your girl has needs.
Boy, the tides have turned, heck it’s more like oceans have parted. I went from mermaid to full on mere Queen with this look. I credit my newfound success to three things:
Pre- work: I actually planned how I wanted this to look. Instead of just rushing into it. This includes using an exfoliator (I love this one I picked up from Dove) on my face body before to ensure everything adhered smoothly
Patience: amazing fantasy make up can’t be rushed. The blending, the layering an even the pre-planning all takes time.
Product: I used products that made the process easier. Like, for example stencils gave me a much neater result and also were so much simpler to manipulate than a pair of panty hose over my head. I also applied a white cream base, which really gripped onto the NYX Ultimate shadows I used to create the ombre scales.
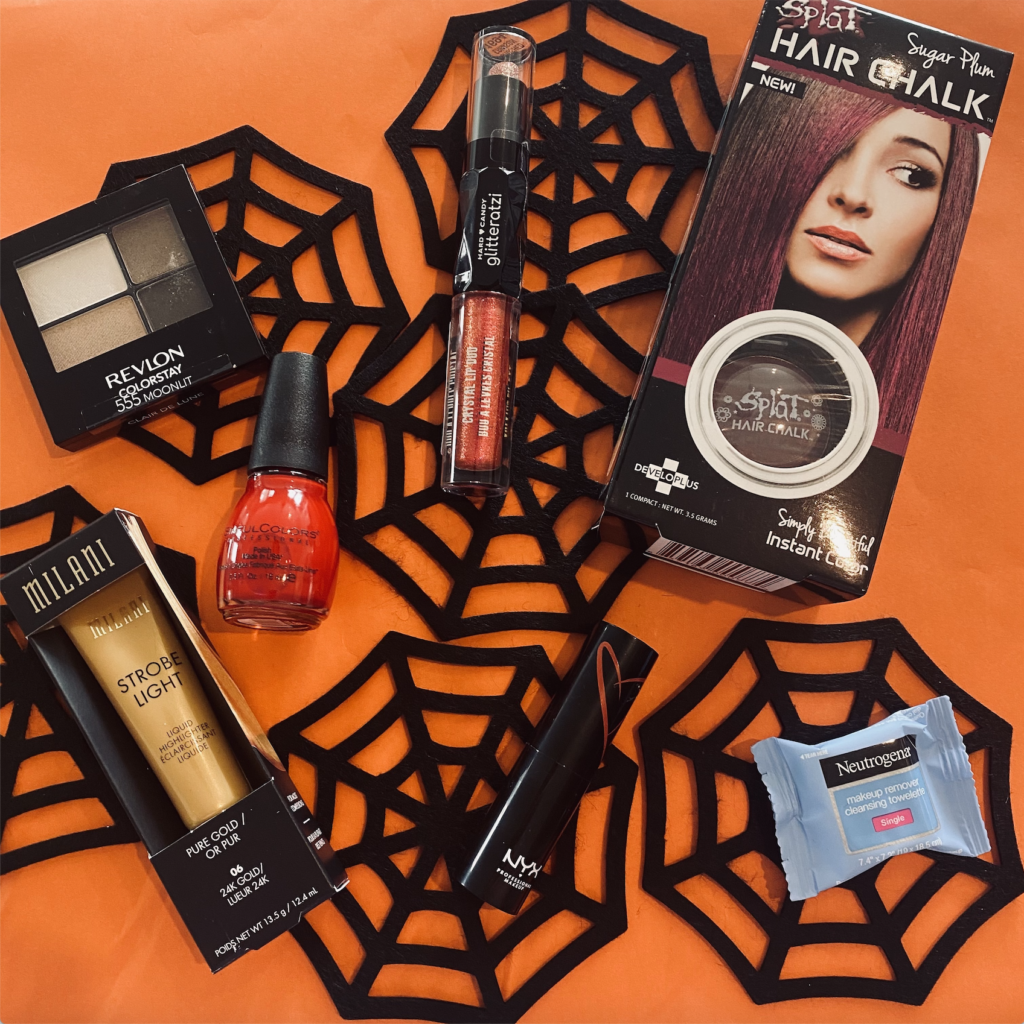
What I Used to Create This Look
This post is lovingly sponsored by Walmart. I earn affiliate commissions on some of the above links.
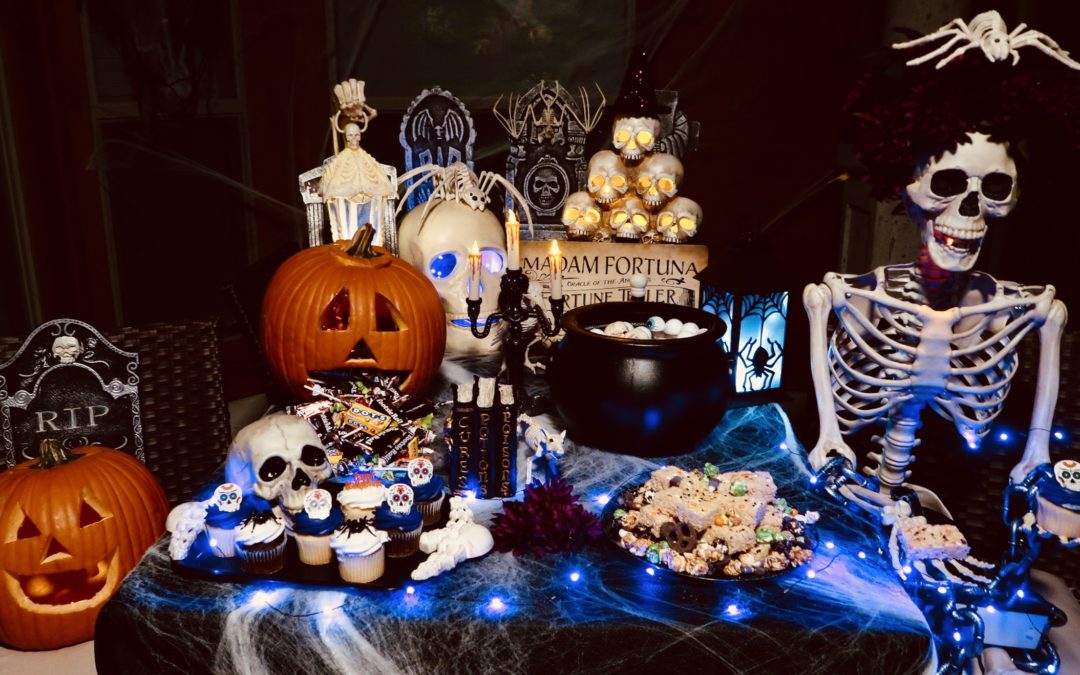
So if you haven’t yet figured it out, I love any occasion that gives me a reason to dress up. Holidays, Theme parties, visual puns- I’ve got a costume for that. So it should come as no surprise that Halloween marks the start of my super bowl. Like every year before it, this year had to be even bigger. So to day Im partnering with Walmart and decided share a new interest of mine- festive home decor. Ah! The benefits of no longer living in a tiny shoe box.
I enlisted the help of my family to create ultimate spooky wonderland and even dressed up as the Queen of my crypt, aka apartment, to celebrate. Now I’m sharing some fun tips to turn your home and yourself into spooky season legends.
3 Tips for Setting the Perfect Spooky Scene
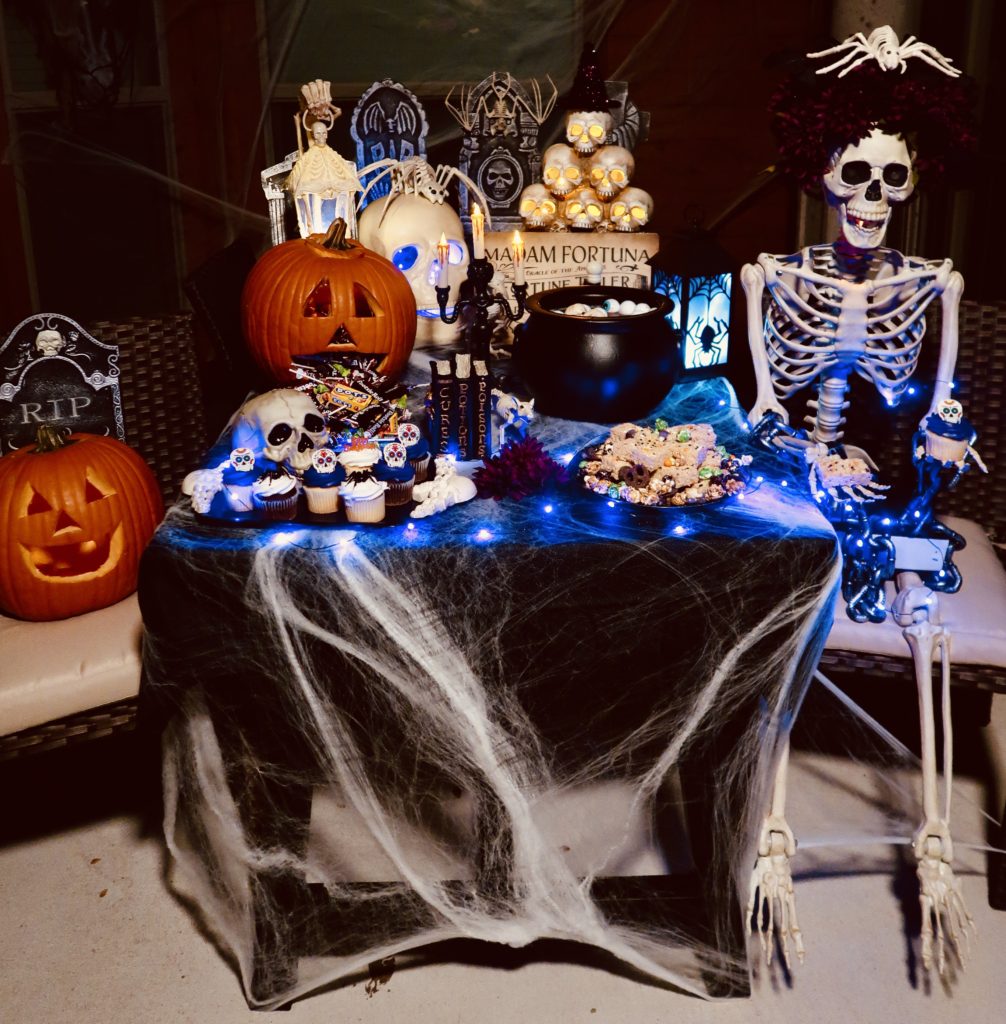
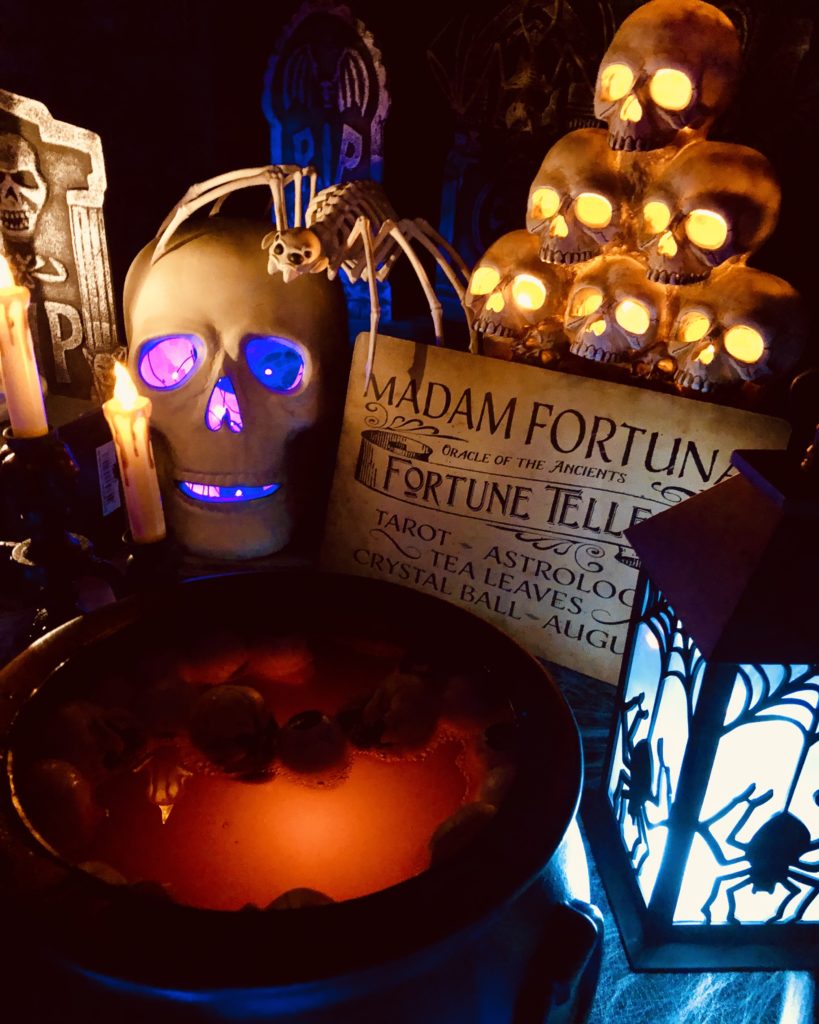
Pick a Theme, Color + Tone: Decorating for a holiday can be super overwhelming. If you’re like me, you want to put everything in the cart. Resist the urge, and instead think of a simple theme and color palette to work with. For this set up our theme was skeletons, our primary colors were purple, white and black and our tone was spooky. This helped us eliminate a variety of items because they just wouldn’t work.
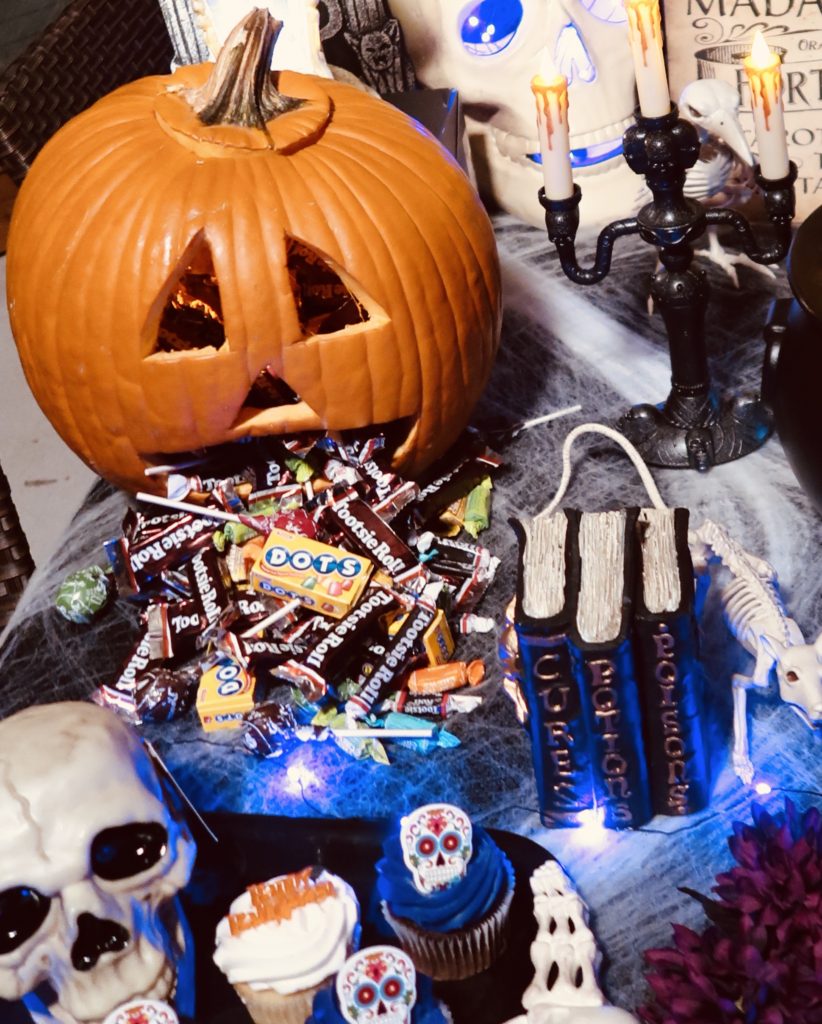
Play with Lighting: Lighting can make a basic table scheme come to life in a new way. For example, we placed small electric candle lights in skulls to make them glow. We waterproofed another light to sit at the bottom of our cauldron, making our punch have a spooky blood red glow. We used pieces like this stacked skulls sculpture and the this candelabra to add dimension and height to the layout.
Have A Sense of Humor: I find the best halloween displays have a sense of humor to them. We added a touch of fun to our display by carving a pumpkin, filling him with sweets so it look liked he was throwing up candy. We also played with the skeleton, constantly changing what sweets he had in his hand or having him wear costumes. Now we can dress the skeleton all through the halloween season and keep the fun new and fresh.
Shop Items in My Spooky Skeleton Table Scape
Note: Some decor items are only available in-store. Also, there are tons of other exciting halloween stuff, so I I’d visit the general halloween decor page in case you need some inspiration.
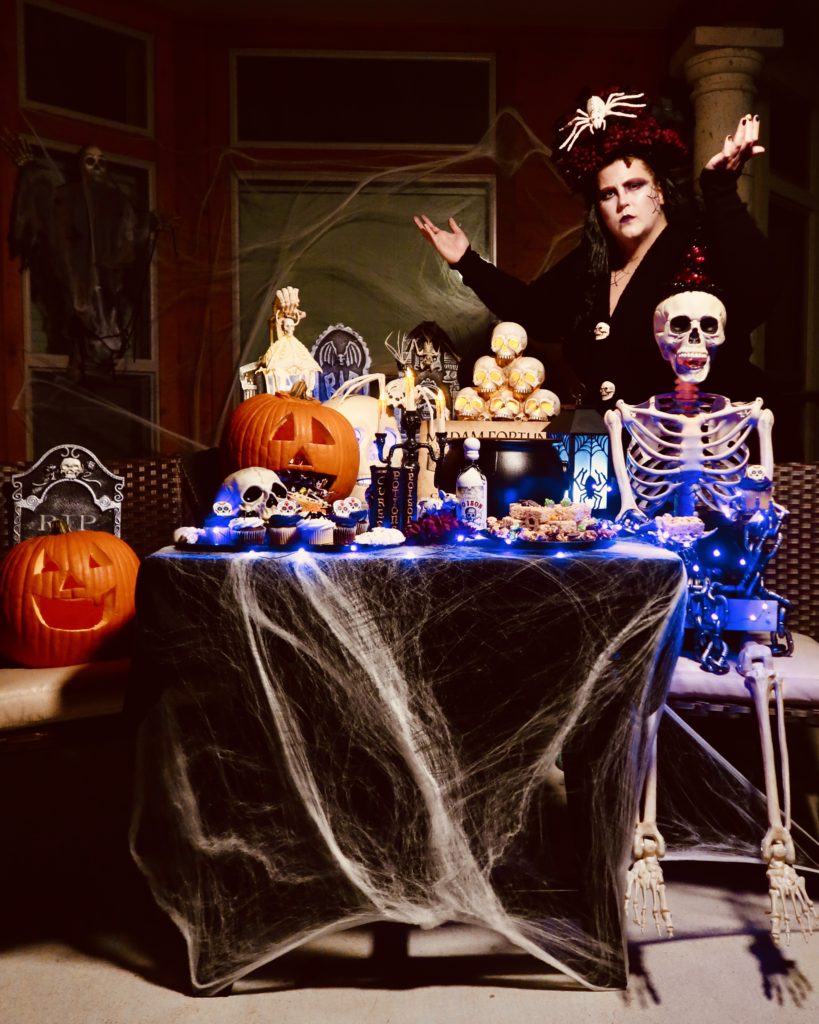
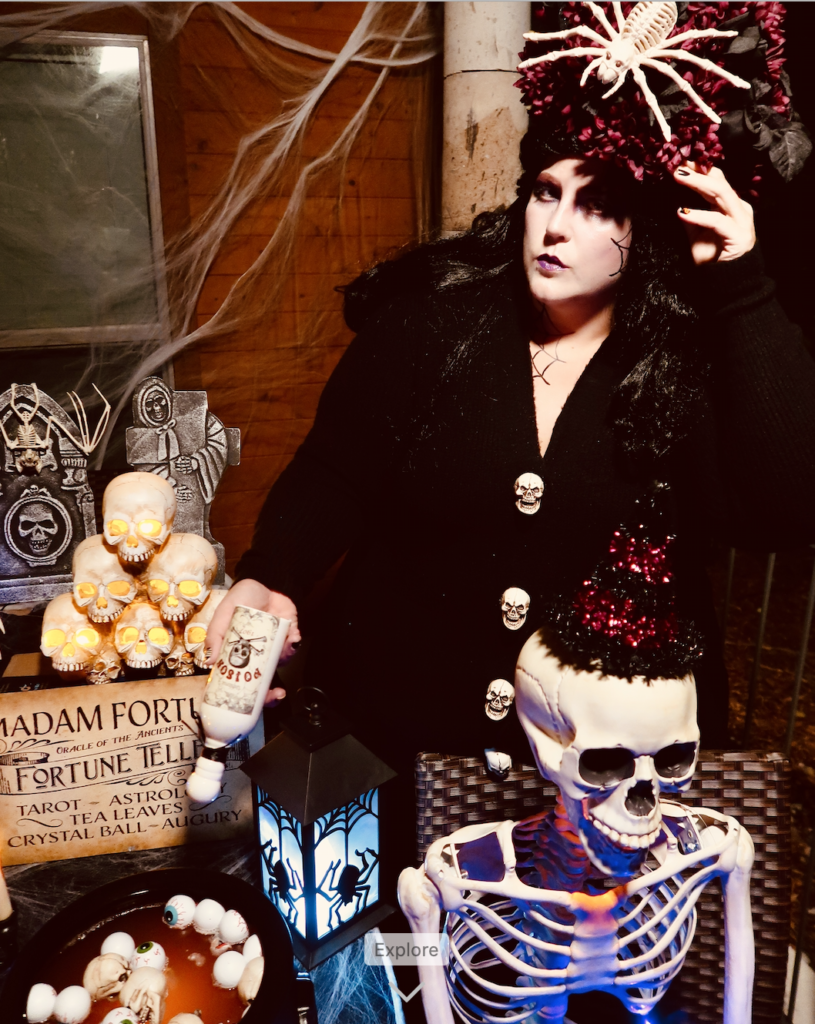
Turning Myself into Queen of the Crypt
So to create this perfect companion spooky skeleton look, I employed one of my favorite halloween hacks- where whatever over the top look you want and declare it your costume. I got inspired initially by this spider skeleton ( yes I know spiders don’t have skeletons, but who cares).
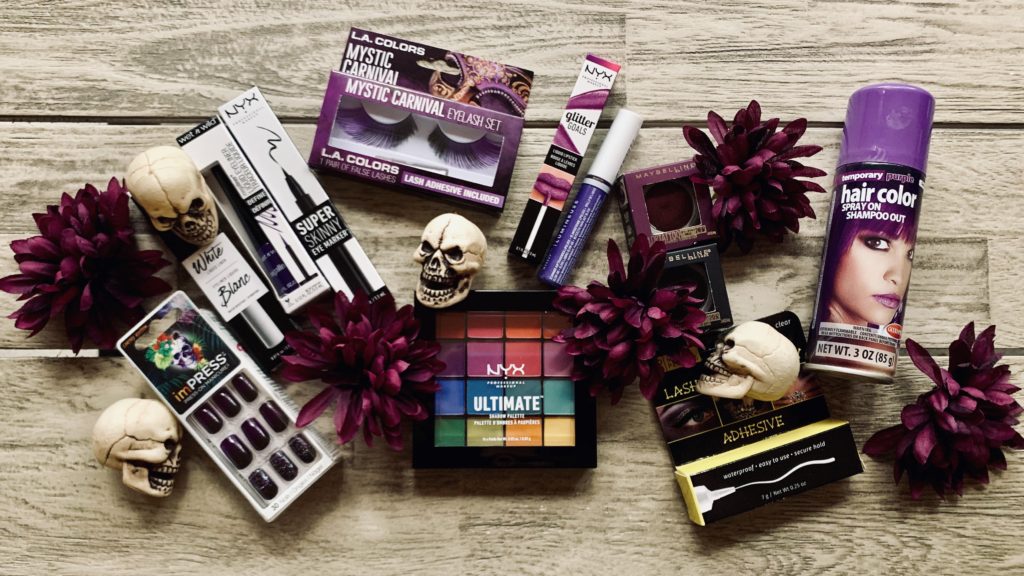
For my eyes I worked with two colors of the over all table scheme- purple and black. I used Maybelline Tattoo shadow in Knockout to draw exaggerated eye shadow shape. Then I used a small amount of concealer over my eye lids to serve as a base for the darkest NYX Palette purple ( the same color I used for my contour.) I then used Tattoo Shadow in charcoal to darken the corners and the same purple highlight to brighten the inner corners of my eye. Then I blended. I blended a lot. I lined the entire eye in the knockout tattoo shadow and used my regular daily mascara. I had these amazing purple and black faux lashes I wanted to use, but my seasonal allergies were not playing along.
I added a bright purple lip using NYXs Glitter Goals in Amethyst Vibes topped with their glow on lipgloss in Violent Violet. I then drew spider webs around my eyes and down my neck using an eyeliner pen. Lastly I put on a black wig and a grand crown I made out of flowers and a my original inspiration- the spider skeleton. I am obsessed with the final look. OBSESSED.
Shop Items Used in My Queen of the Crypt Look
Note: I earn affiliate commissions on some of these links. This post was sponsored by Walmart.
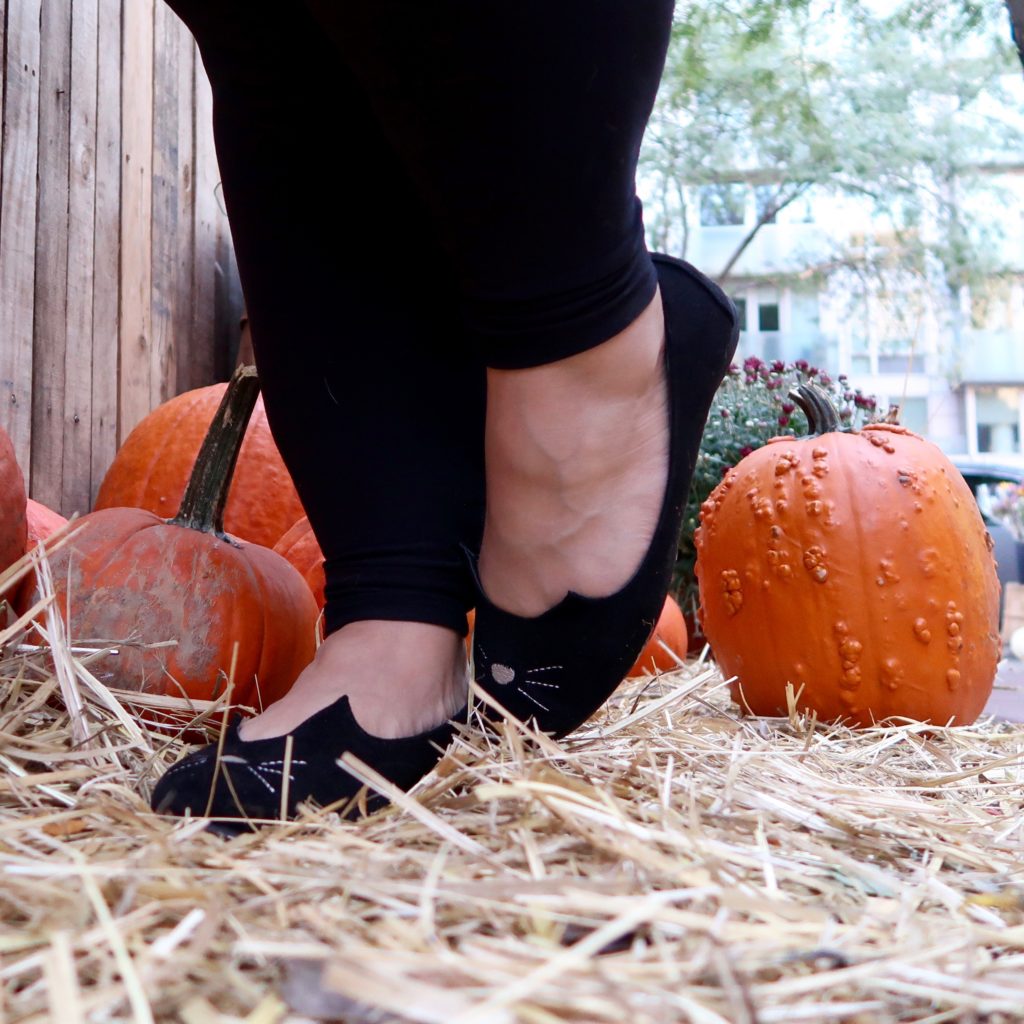
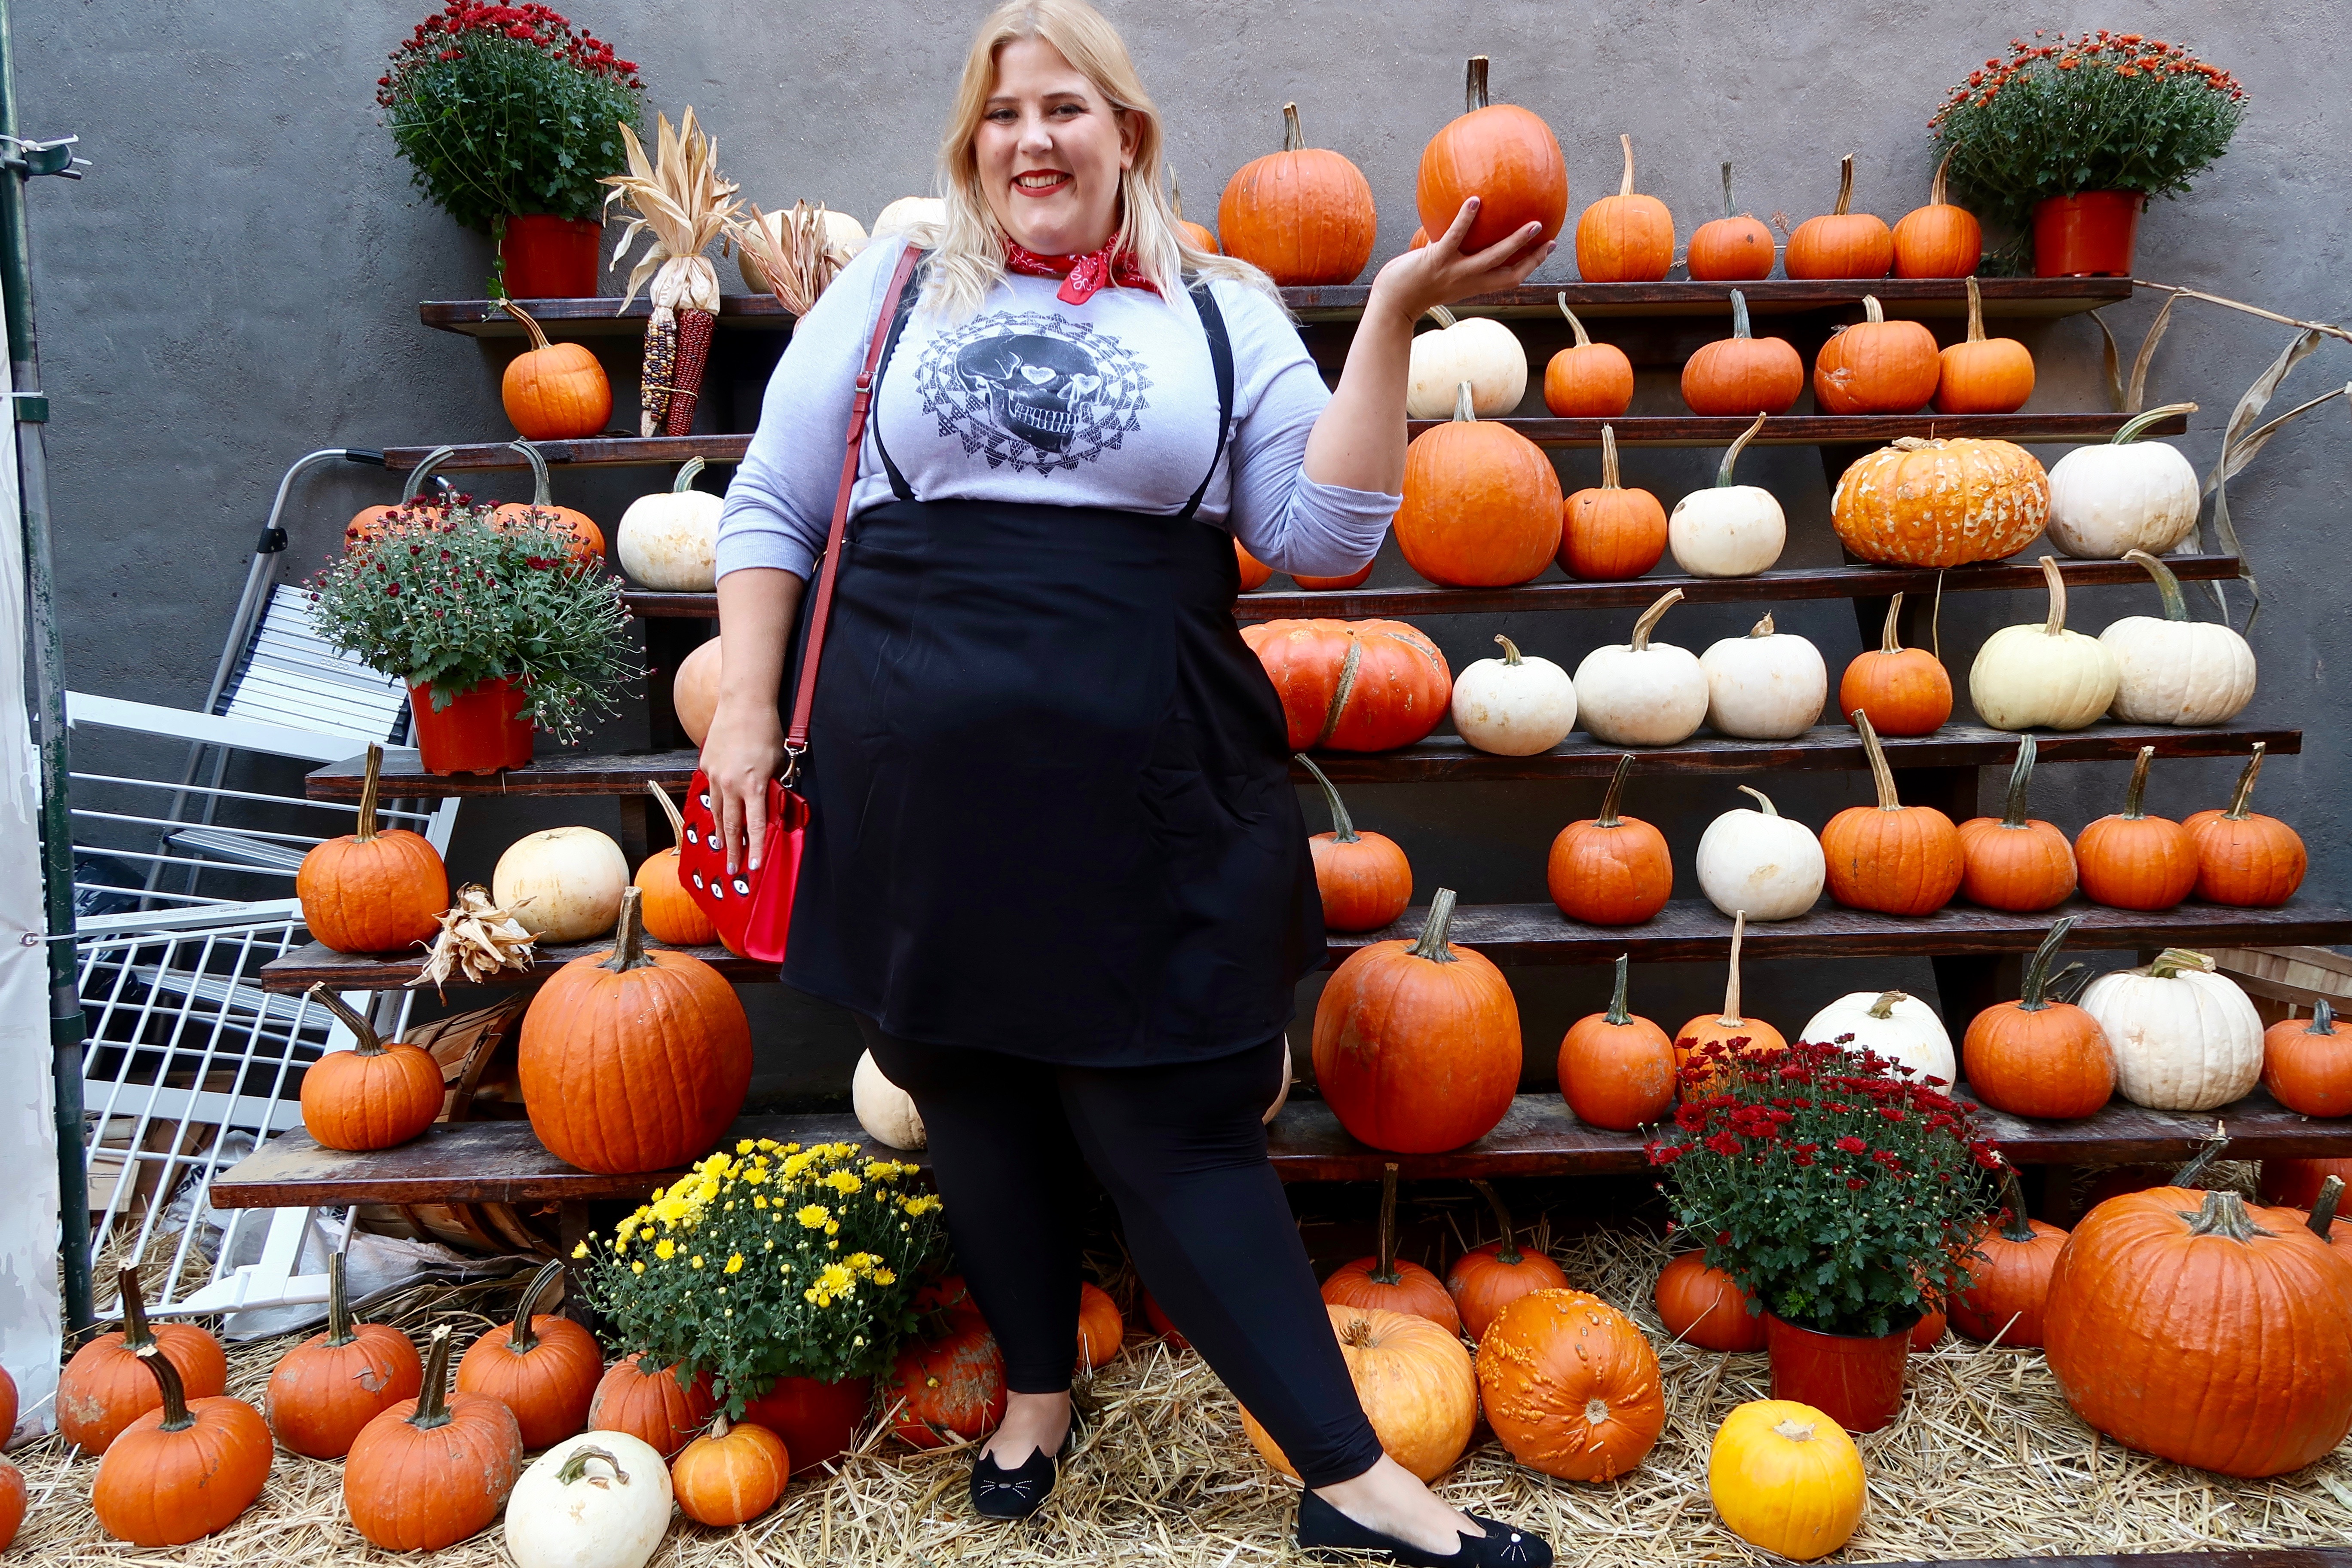
October is my birthday month and as much as I seem like the type of person who has fantastical 30 day long celebrations, most of my birthdays have been quite dull. The last time I had a true birthday party was when I turned 16 and was living in Finland a few friends surprised me with a little get together. In fact, come to think of it, for the last 3 years I have been working on my birthday. The first year I was in Cincinnati on a sales call; our dear rep gave me a red whiffle ball and bat, mardi gras beads and hug as a birthday thank you gift. Not my exact cup of tea, but a super sweet gesture. The second year I was on a 24 hour flight to India in coach, and though I arrived a sweaty smelly mess technically 2 days later, my coworkers and I celebrated my belated birthday with cake and hugs. Last year, I was just plodding along doing work and life as one does- nothing all too special. It’s been a good while since I’ve actually done something exciting on the lovely day that I am came to be. In my life I do a lot to celebrate other people. A LOT. I’m a giver and as a result, I tend to not plan things for myself. This year, I am trying to change that. Instead of waiting for something spectacular to just magically happen on my birthday- spoiler alert it never does- I am taking the bull by the horns. And, instead of just celebrating on the day I came out of my mother’s woohoo, I am going to be filling the month with things that make me happy. Not a birthday month, per se, more of a “my preferences come first” month. I’m going to spend October really focused on what’s best for my happiness, what makes me smile, and frankly doing all the stuff that makes my life more fun.To kick off Glitter’s Fall Fest, I spent today exploring my neighborhood with a dear friend with our pups. We went to the dog park, had some wine, and stumbled upon the most adorable farmers market/ pumpkin patch/ Instagram perfect background. It was kismet because I just happen to be wearing the more adorably spooktacular outfit from Modcloth. I love how the grey sweatshirt is printed with a skull- but like cool hip skull that listens to indie music. Scary skulls aren’t my thing. I paired it with a black skirt with attached suspenders, black comfy leggings, and the fanciest for feline inspired footwear. It was the perfect way to start to what I am pretty certain is going to be an all together awesome month.
This post was sponsored by Modcloth; some links I earn affiliate commissions from.


 October is my birthday month and as much as I seem like the type of person who has fantastical 30 day long celebrations, most of my birthdays have been quite dull. The last time I had a true birthday party was when I turned 16 and was living in Finland a few friends surprised me with a little get together. In fact, come to think of it, for the last 3 years I have been working on my birthday. The first year I was in Cincinnati on a sales call; our dear rep gave me a red whiffle ball and bat, mardi gras beads and hug as a birthday thank you gift. Not my exact cup of tea, but a super sweet gesture. The second year I was on a 24 hour flight to India in coach, and though I arrived a sweaty smelly mess technically 2 days later, my coworkers and I celebrated my belated birthday with cake and hugs. Last year, I was just plodding along doing work and life as one does- nothing all too special. It’s been a good while since I’ve actually done something exciting on the lovely day that I am came to be.
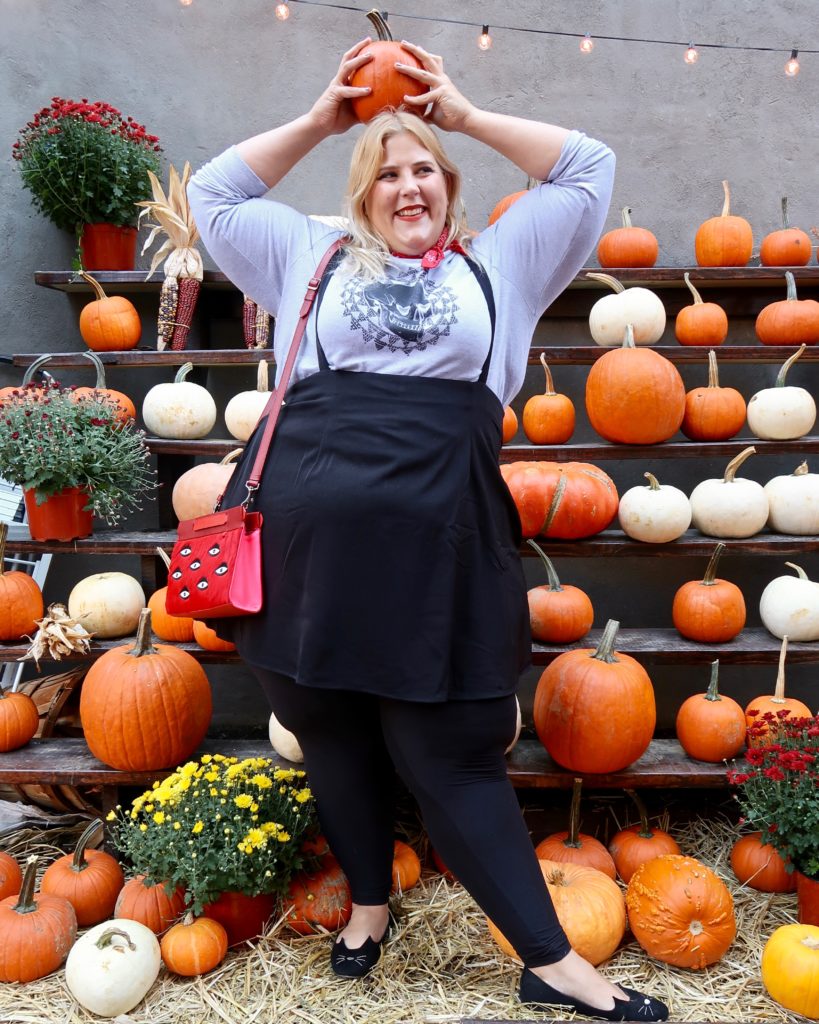 In my life I do a lot to celebrate other people. A LOT. I’m a giver and as a result, I tend to not plan things for myself. This year, I am trying to change that. Instead of waiting for something spectacular to just magically happen on my birthday- spoiler alert it never does- I am taking the bull by the horns. And, instead of just celebrating on the day I came out of my mother’s woohoo, I am going to be filling the month with things that make me happy. Not a birthday month, per se, more of a “my preferences come first” month. I’m going to spend October really focused on what’s best for my happiness, what makes me smile, and frankly doing all the stuff that makes my life more fun.
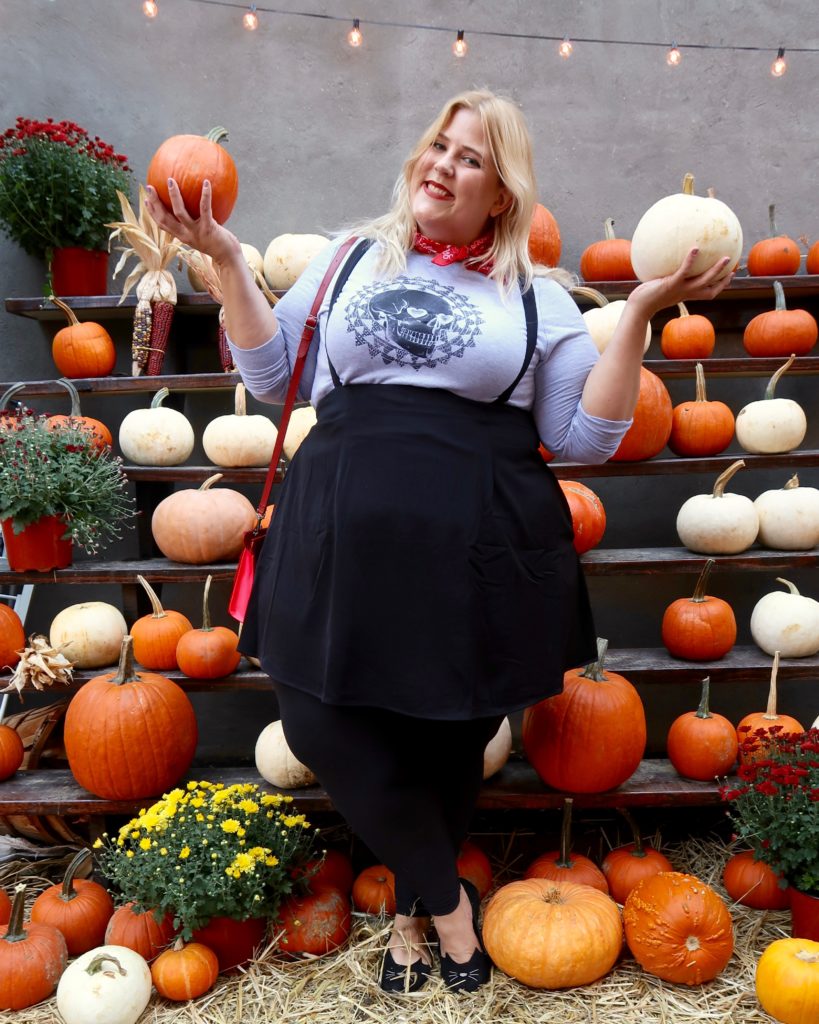 To kick off Glitter’s Fall Fest, I spent today exploring my neighborhood with a dear friend with our pups. We went to the dog park, had some wine, and stumbled upon the most adorable farmers market/ pumpkin patch/ Instagram perfect background. It was kismet because I just happen to be wearing the more adorably spooktacular outfit from Modcloth. I love how the